I had an idea about Silhouette Patterns 195 (Sweater Set) that I wanted to try. My thought was I chose the wrong size. I thought I fit the description of the W sized woman. The W doesn’t have and never had large bone structure and height. She’s not the mythical Amazonian but rather a regular sized female human who has gained padding over the years. Sounded just like me and so I chose 5w at the shoulders merged out to 7w at waist and hips.
It worked. With effort but it worked. The biggest change was taking out length between shoulder and bust. I’ve never had to either lengthen or shorten along that line. For the 5W I removed 2″. After that it was expected changes. I tweaked the circumference and sloped the shoulder. I altered for my asymmetrical shoulder during construction and before the ‘real’ garments, added length at the hem just because I like my garments a little longer. Then I made a couple of tank tops for summer. I was happy with 195 other than I really don’t like a french dart.
Then fall rolled around and I added the sleeve. Yikes! What a disaster. I couldn’t believe all the drag lines. What was worse, I couldn’t remove them. I tried a second fabric ’cause I knows that the fabric always wins. Except it didn’t. 195 would not fit with sleeves added. I was perplexed; puzzled; miffed a little. I set 195 aside and moved onto other and I might add successful projects.
But my clever left brain continued to puzzle over 195 eventually offering a possibility. Start with the 4. Yeah drop back into the patterns not drafted to fit anything special*1.
So I did.


I traced a size 4 and added 1″ to the side seams added 5/8″ shoulder slope and 5/8″ RBA. Should have added 1.5 at the side seams because subsequent pattern changes were limited to letting out the side seam to 1/4″ and making the shoulder slope permanent.


I knew I wanted added length which had to be done at the tissue stage and I thought the sleeves were a bit floppy from elbow to wrist. So I finished my muslin (of polyester/cotton knit light-weight sweater fabric with 2-way, 75% stretch) and called it Pajama Top.

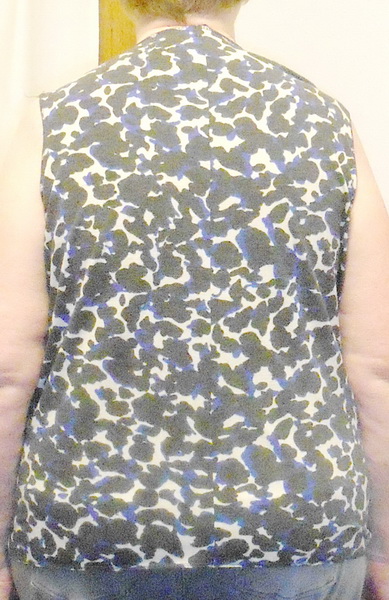
I looked twice at the side views. Really focused on the bust:


That dart insisted on forming in every picture, both right and left. Since I’m trying out things anyway, I decided to go up a cup size. I traced the B cup for the muslin above; now I traced the C cup pattern. Made my tissue alterations (summarized below) and cut into ‘real ‘ fabric i.e. an rayon knit with a print and in colors I liked very well.
The first fit revealed, I had fixed everything except the right side V’s

I put it away overnight. I had tried pinching out the shoulder. Didn’t work. There is a limit to how much you can pick up at the shoulder. If this was one of my princess seam patterns I would have already altered and stitched the right side 1/8″ deeper than the left. It’s like not only is my right shoulder lower, but the right side of me is slightly smaller. Or maybe the left is slightly stretched and bigger. I don’t really know. But I do need to change the right while the left will look perfect.
So solution 1 (pinching at the shoulder seam) was out of the running. As was Solution 2 (deepening the princess seams). I considered adding darts where the princess seam would have been. I didn’t really want that look and moved along to Solution 3: Restoring the armscye. A pattern maker would have thought of this first. When the armscye is changed, (the 5/8″ shoulder slope) it affects the sleeve cap. The cap can be changed by an equal amount; the cap can be ignored and it will gather into the armscye; or the armscye needs to be restored. If I restore the armscye i.e. change the armscye, I can’t unchange it. So if changing the armscye has not effect, I’ll still need to think some more. If changing it works, well “I’m in like Flynn”; but if changing the armscye makes those drag lines worse: I’m hosed. Because I can’t undo the armscye change I will have ruined a beautiful fabric.

I put my pattern piece back onto the right side and slid it down 1/4″. Cut the armscye to the new depth; repeat on back with back pattern piece. Resulting in

A much improved right side!


So last change to the basic pattern is restoring the armscye. Although I am wondering if I shoulder add length to the center front. I usually need to do so except it doesn’t show up in every picture of the re-muslined SP195. Because it doesn’t, I don’t know if I have a front length problem, a camera angle issue or an editing issue. This is one alteration that will have to wait for experience.
End analysis: I’m very happy. Many of the changes I made reflect my personal preferences and not the drafting of the pattern. In fact I made more small, personal style changes than I did fit alterations. That’s a really good record.
BUT I still don’t love french darts.
^^^^^^^^^^^
*1 I practically hold up a silver cross anytime someone says ” I drafted this and it is perfect. I’ve taken into account all the changes that need to be made for your problems and its perfect! ” Well, it never is perfect. As someone else pointed out it can’t be. There’s a whole tomb of fitting alterations that can’t possibly be applied to every pattern. Pattern makers listen to me: never claim you’ve solved it all. You can’t be expected to deliver a pattern designed for square and at the same time sloped shoulders. And while asymmetrical shoulders are common, not everyone has them; nor are all are sloped evenly or the same amount. Quit making that ridiculous claim!
Net Pattern Alterations
- Trace Size 4 regular
- Add 1.5″ to side seams
- Add 1″ to CF length
- 5/8″ RBA
- Shoulders
- 5/8″ shoulder slope
- +1/4″ for shoulder pads
- Restore the armscye 3/8″ lower
- +2.5″ length
- Establish my standard SA
- 1/4″ neckline, armscye, sleeve cap
- 1-1/4″ hem
- 1/2″ elsewhere
- Sleeve
- Trim 1″ from sleeve width at hem zeroing at underarm.
- Stitch sleeve cap to armscye w/1/4″ SA but don’t change tissue.
- Stitch underarm seam 1/2″; hem 1-1/4″


